HTML 107: Forms and Buttons in HTML
Master buttons in HTML and form input types like checkboxes, drop-down menus, password, text, email, number, file, textarea, calenda, and radio button

Oloche Aboje - Frontend Developer & Tech Educator
I'm based in Coventry, UK, with a background in Architecture that has transitioned into Fontend web development. After completing a frontend development boot camp at the University of Birmingham, I've become proficient in JavaScript and React, and I’m passionate about making coding more approachable for everyone.
I love to share my journey through blogging, where I simplify coding for beginners with clear explanations, stories, and quizzes. My blog isn’t just a record of my learning; it's a place where I help others start their coding adventure in a friendly and engaging way.
Here, you'll find insights into my transition to tech, alongside tips and tricks that make programming less intimidating and more fun. It's about creating a welcoming space for anyone curious about coding, offering guidance and encouragement every step of the way.
Welcome to my blog, where each post aims to make learning tech enjoyable and accessible to all.
We have come this far in HTML, just three more articles before we complete the HTML course.
Let's take a refresher quiz before we proceed to today's lesson.
Refresher quiz
What is a table in HTML and how are they created?
table tag, with tr table rows nested into it. The first tr wraps a th or table heading, then the next sets of tr rows wrap table data or td, as many as required.What is the HTML tag used to create tables and what purpose does it serve?
table is used as the main wrapper for HTML tables and it helps structure the data into rows and columns.What are table rows and why are they used?
tr is used to create data in rows. They are used to group related content and display them horizontally for proper data organization.What HTML tag is used to define the headings of tables?
th or table head tag is used for defining table headings and they are quite different from the regular table data td as they appear bold by default and serve as labels or headings for each column.How are table data defined and what purpose do they serve?
td are cells that hold the data on the table to be displayed to the user within the table, corresponding to the rows and column heading.How do you create cell borders in HTML Tables?
border attribute is used inside the opening table tag, and its value is set to 1 and above. This helps to add visual organization to the table structure.How do you justify or push the content of a table to the left, right, or center, and what tag is used for this? Also, how is it used?
align attribute is used for this. Proper alignment is necessary for readability. This attribute is set in the tr table row opening tags, of the the heading.How do expand or reduce the width of a table cell and how is this done?
width attribute is used to define the width of a cell. This is set inside the table row tr opening tags, of the table headings th.How do you add additional rows or columns to a table?
tr tags with nested td content, so each new row has some data. Additional columns are added by creating additional th tags nested within the tr tag of the heading section.At a very high level, what is the organizational structure for a table in HTML?
table element tree is the table tag wrapping the entire table. This is followed by the table heading, then the table data. All the table heading th elements are nested inside a single tr tag. Then each set of table data td tags, representing the data that corresponds to the headings, are nested within tr tags as well. So, if you had 5 headings or th elements for instance, then you would equally have 5 td elements nested within each row tr element for each category of data.Phew!!! That was a lot.
Let's proceed to the subject of today.
HTML Buttons
Buttons are used in HTML to link users to other pages or sections on your page or to add some other interactivity to our page.
To fully demonstrate Buttons in HTML, we will create a new HTML page in our project, and name it contact.html. Create this file inside our assets directory.
Create a boilerplate code for the HTML document and title the page
Contact Me.Back in your index page, in your
contactssection, after the YouTube contact, create abuttontag and let the button say 'Reach me'.
<button>Reach Me</button>
- We need to nest this button element inside of an anchor tag with the value of the
hrefattribute pointing to the relative path of the newly createdcontact.htmlfile, as follows:
<a href="./assets/contact.html"><button>Reach Me</button></a>
- Make the page load in a different tab by adding the
target="_blank"attribute to the anchor tag.
HTML Forms
Now, we will create a form on the contact page to demonstrate the concept of forms:
To create a form, you use the
formtag and nest theinputandlabeltags in it. Forms typically also have an element for submission. This can either be abuttonor an anchor tag.Inside our
contactpage, create anh1heading with content:Contact me.Create a paragraph element with the following content:
Kindly fill in the form below to get in touch with meCreate a
formelement using theformtag, and just delete theactionattribute for now.
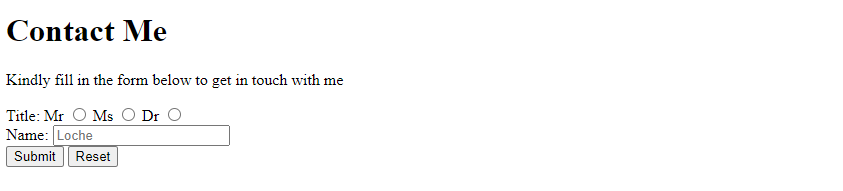
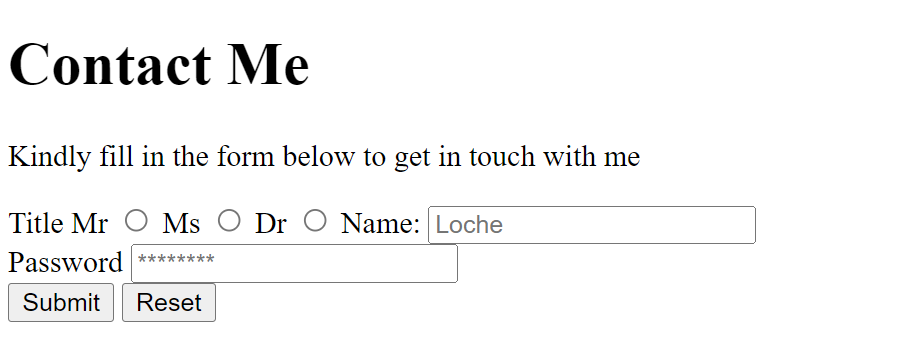
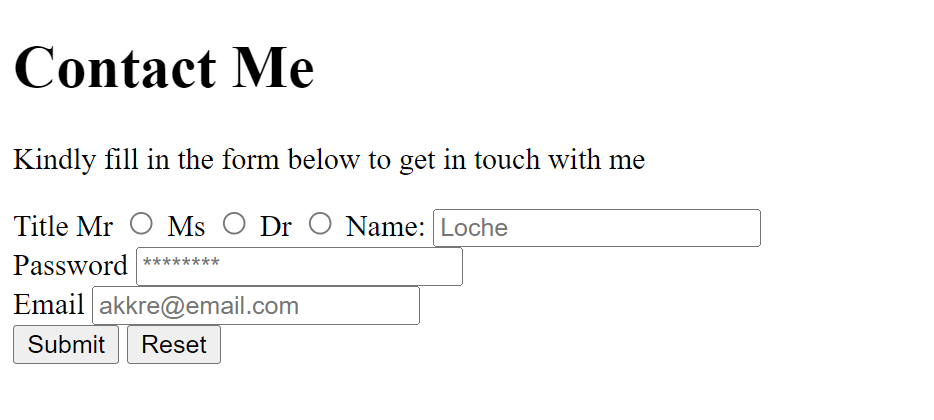
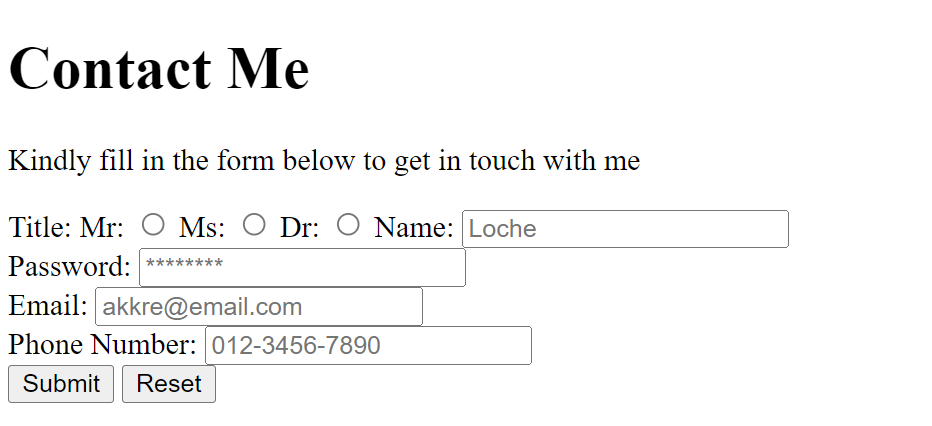
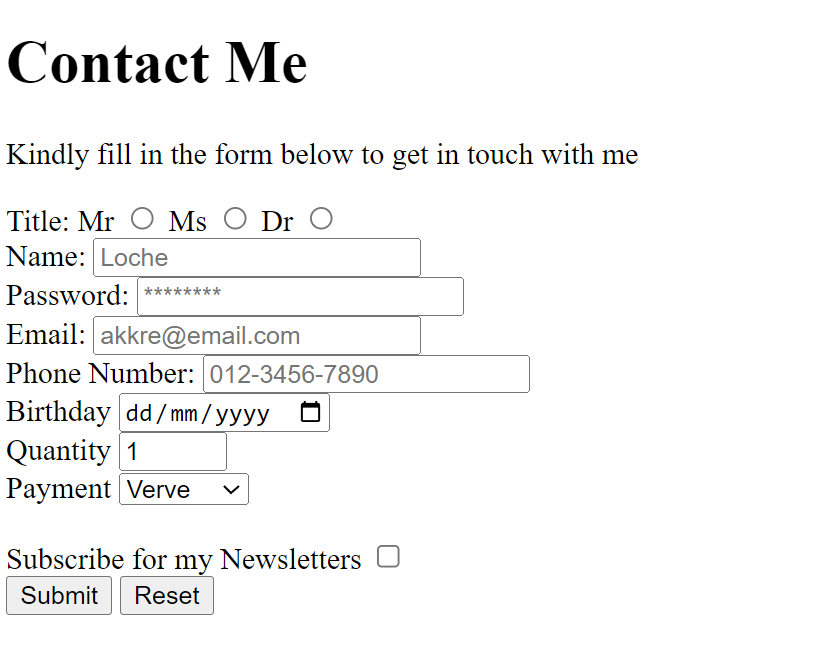
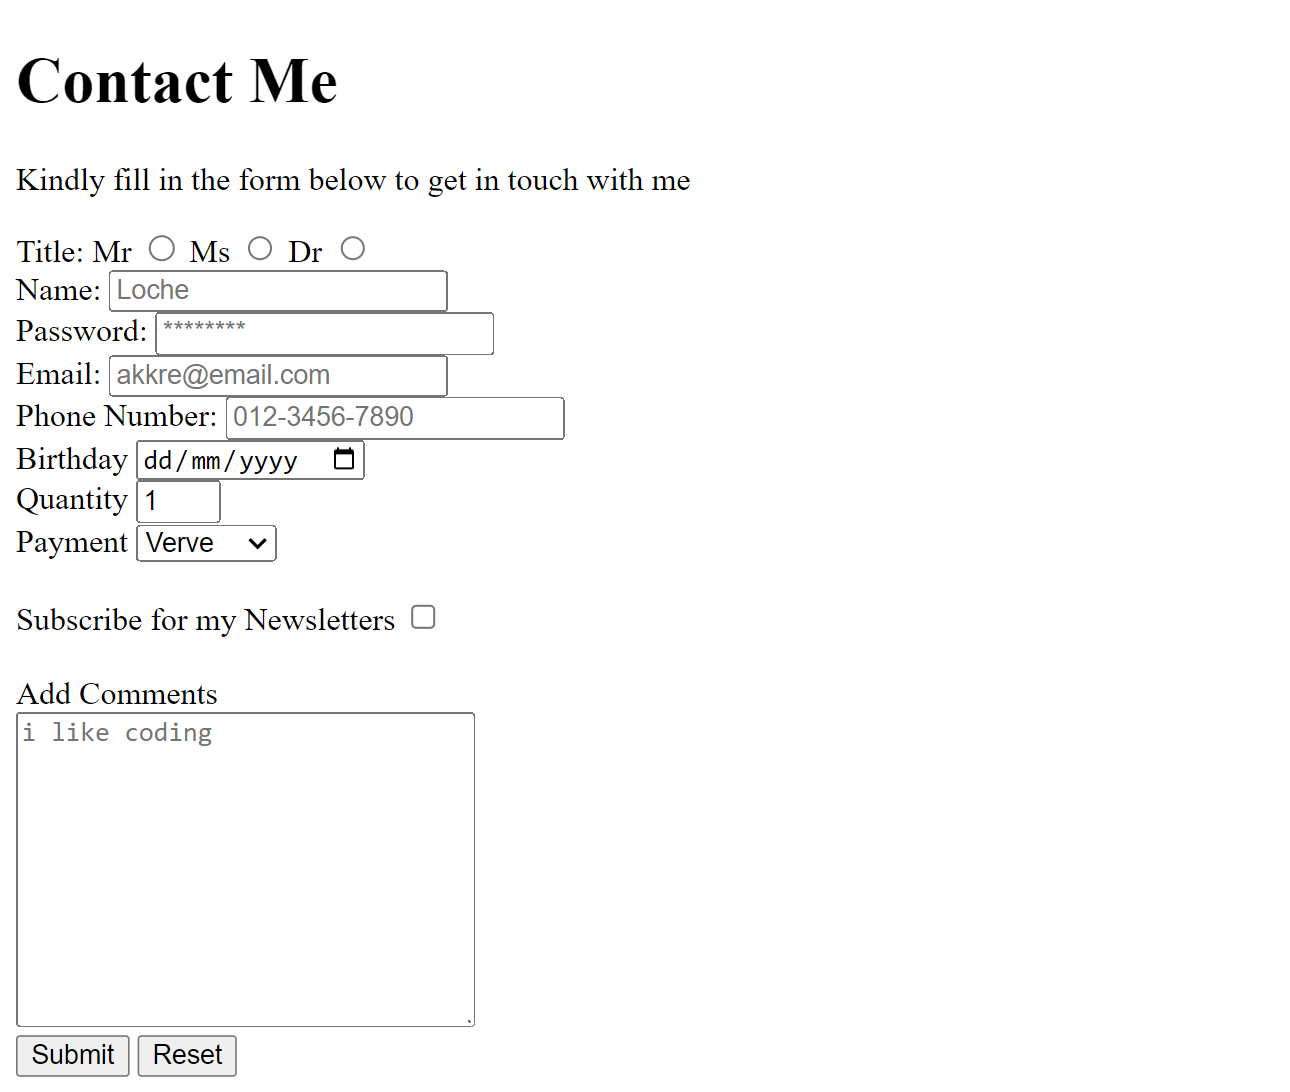
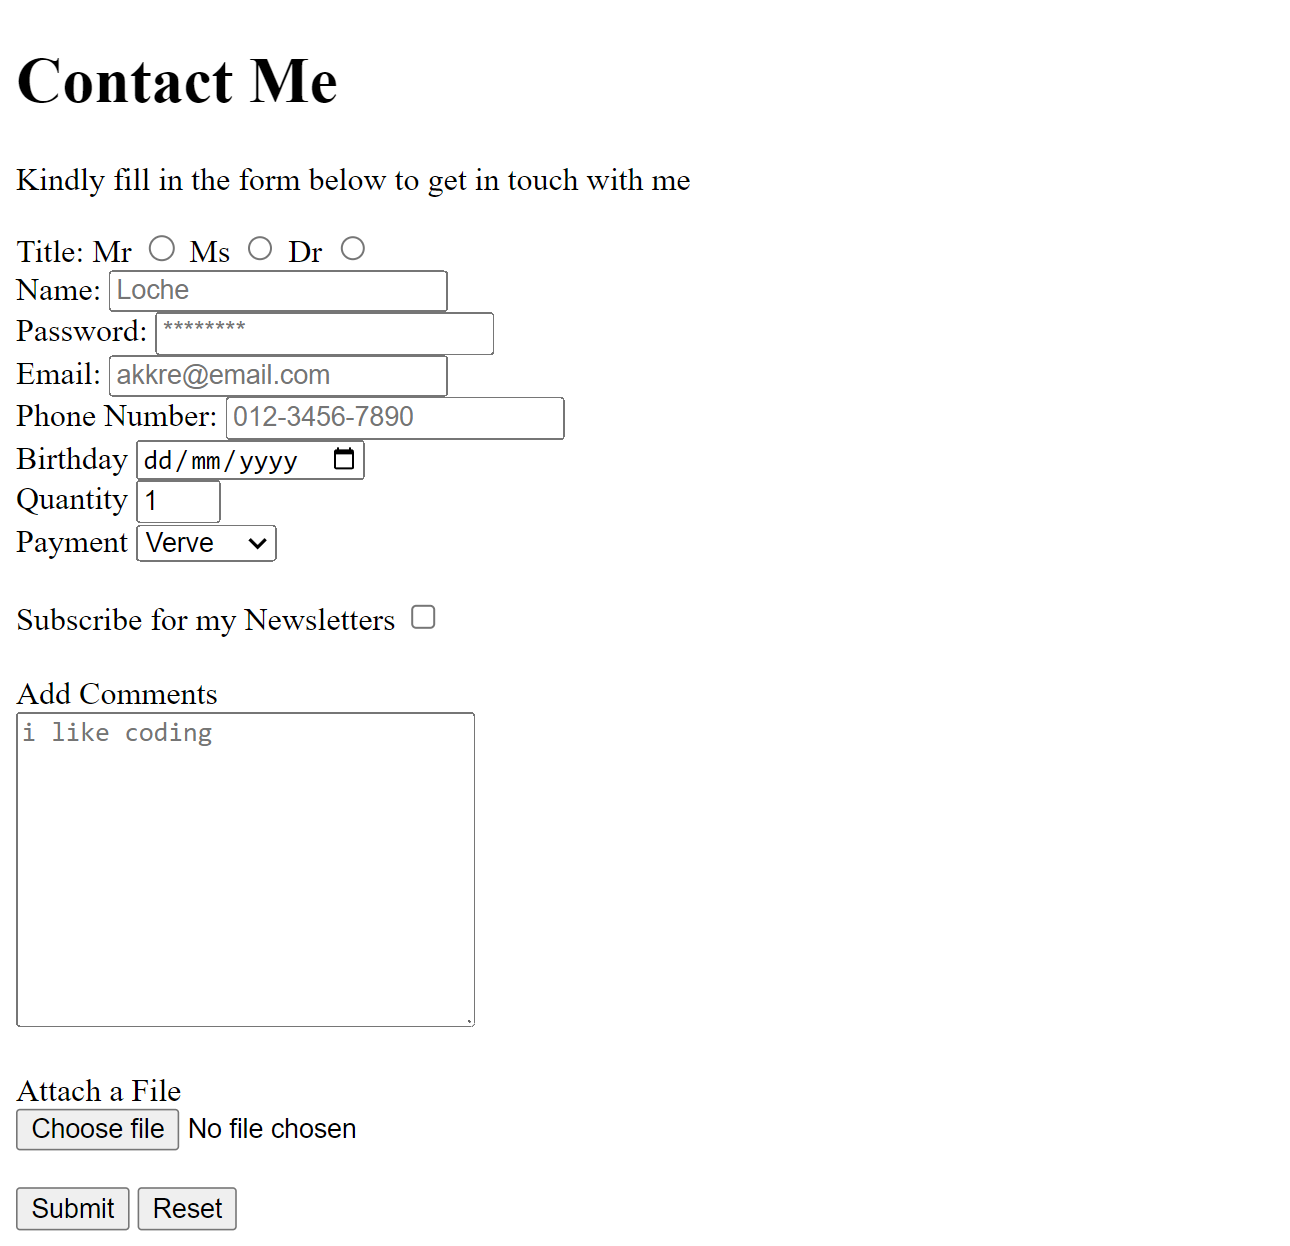
<h1>Contact Me</h1>
<p>Kindly fill in the form below to get in touch with me</p>
<form>

</form>
Radio Button Field
Radio buttons only give users a single option to select from a list of options. We will give the user an option of titles to select from: Mr, Ms and Dr
Nested inside the form element, create a label tag that says
Titleand add aforattribute oftitle.Next, create 3 pairs of
labelandinputtags forMr,MsandDrand addforattributes ofmr,msanddrto theirlabeltags.In their
inputtags, add atypeattributes ofradioand match theiridto their respectiveforattributes.Add a
valueattribute in theirinputtags as follows:mrmsanddrrespectively. Thevalueattribute is necessary for form submission.It is important to group radio buttons so that only one is selected at a time, to do this, we add a
nameattribute to theirinputtags, giving them the samevalueoftitle. This adds them all in the same group namedtitle.
<!-- form element wrapper -->
<form>
<!-- Title field -->
  <label for="title">Title</label>

  <!-- Mr label & input-->
  <label for="mr">Mr</label>
  <input type="radio" id="mr" value="mr" name="title">

  <!-- Ms label & input-->
  <label for="ms">Ms</label>
  <input type="radio" id="ms" value="ms" name="title">

  <!-- Dr label & input-->
  <label for="dr">Dr</label>
  <input type="radio" id="dr" value="dr" name="title">
</form>

Name Field
Inside this form tag, nest the first set of
inputandlabeltags to collect users' NamesThe
labeltag tells the user what to do within the input area.The
typeattribute for theinputlabel is set totextby default, and theforattribute for thelabelis set tonamefor screen readers to be able to read it, and also, to move your cursor to the text box if the label is clicked on.The
idattribute for theinputis set to match theforattribute of thelabel, to link themWe need a
submitbutton, we will create this using an input tag oftype="submit"right now the submit button doesn't work as expected as we have not set any backend code to receive the form.Add a
requiredattribute to theinputtag to make that field a must fill field for submission.Add
minlengthandmaxlengthattributes for 5 to 10 charactersAdd a
resetbutton by creating aninputtag and setting the type toreset, for the user to be able to reset the form.Add a placeholder to give the input field a sample text, by adding a placeholder attribute to the input tag.
Add a line break to move the submit and reset buttons to the next line.
<!-- Name Field -->
  <label for="name">Name:</label>
  <input type="text" id="name" minlength="5" maxlength="10" required placeholder="Loche">
  <br>
Password Field
Within the form tag, create another pair of
labelandinputtags for our password.Again, set the
forattribute of thelabeltag topasswordwhile matching this with theidattribute of theinputtag.Set the content for the label tag to
PasswordIn the input tag, add attributes for the minlength, maxlength, placeholder, and required, as desired.
<!-- Password field -->
    <label for="password">Password</label>
    <input type="password" id="password" placeholder="********" minlength="6" maxlength="12" required>
    <br>
Email Field
Add another pair of
labelandinputtags inside theformelement, just above thesubmitandresetbuttons.Set the
forattribute of thelabeltoemailand add anEmailcontent to thelabeltag.Add a
typeattribute ofemailto theinputtag, also add arequiredattribute, and set theidattribute toemail, to match theforattribute of thelabel. Don't forget to add a placeholder text ofakkre@email.com.
<!-- Email field -->
    <label for="email">Email</label>
    <input type="email" required placeholder="akkre@email.com" id="email">
Phone Number Field
Add another pair of
labeland inputtagsfor the phone number field.To the
labeltag, set the content to Phone Number and add aforattribute ofnumber.To the
inputlabel, set thetypeattribute totelor telephone, theidto number, theplaceholderto012-3456-7890,and also set therequiredattribute.Also, set the
patternattribute to match the pattern on theplaceholder, as follows:[0-9]{3}-[0-9]{4}-[0-9]{4}. This means the first 3 digits are numbers from 0-9, then a dash, then the next 4 digits are numbers from 0-9, then a dash, then the last 4 digits are numbers from 0-9.
<!-- Phone Number field -->
    <label for="number">Phone Number</label>
    <input type="tel" required placeholder="012-3456-7890" id="number" pattern="[0-9]{3}-[0-9]{4}-[0-9]{4}"
    <br>
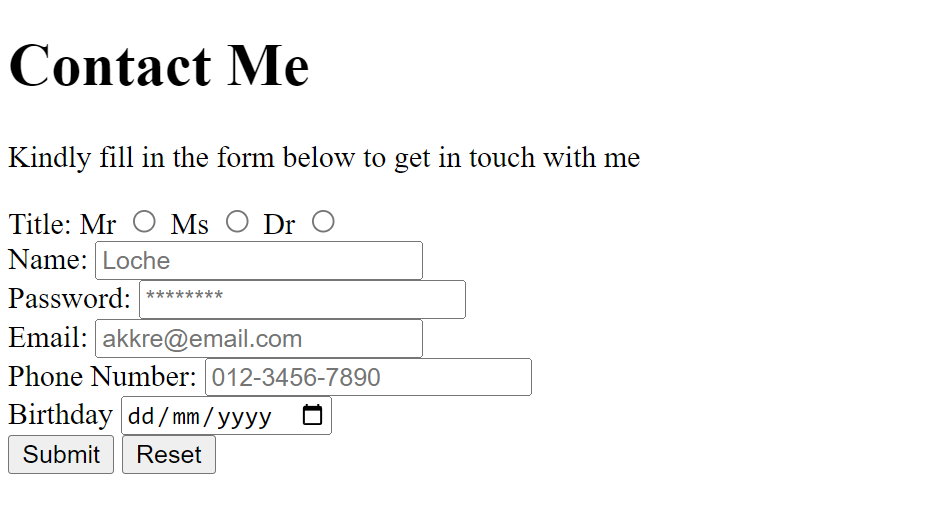
Calender Field
This is just for demonstration purposes only.
Create a label tag and set the content to
Birthdayand theforattribute tobirthdayCreate an
inputtag, set thetypeattribute todateandidtobirthday. This brings the user a calendar object. Then add a page break after.
<!-- Birthday field -->
    <label for="birthday">Birthday</label>
    <input type="date" id="birthday">
    <br>
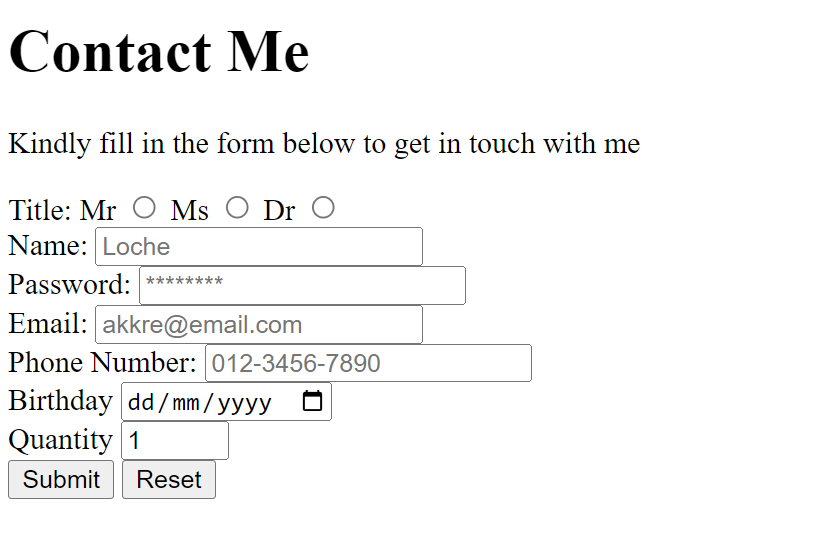
Quantity Field
We assume that the user is going to enter a quantity, as though they are making an order, again this is only for demonstration.
Add a
labeltag and set thecontenttoNumber, also set theforattribute tonumber.Add an
inputtag and set thetypeattribute tonumberandidtonumber.Set the
minandmaxattributes to0and99respectively because we don't want the user selecting a negative number.Set the default value to 1, like so:
value="1"
<!-- Quantity field -->
    <label for="number">Quantity</label>
    <input type="number" id="number" min="0" max="9" value="1">
    <br>
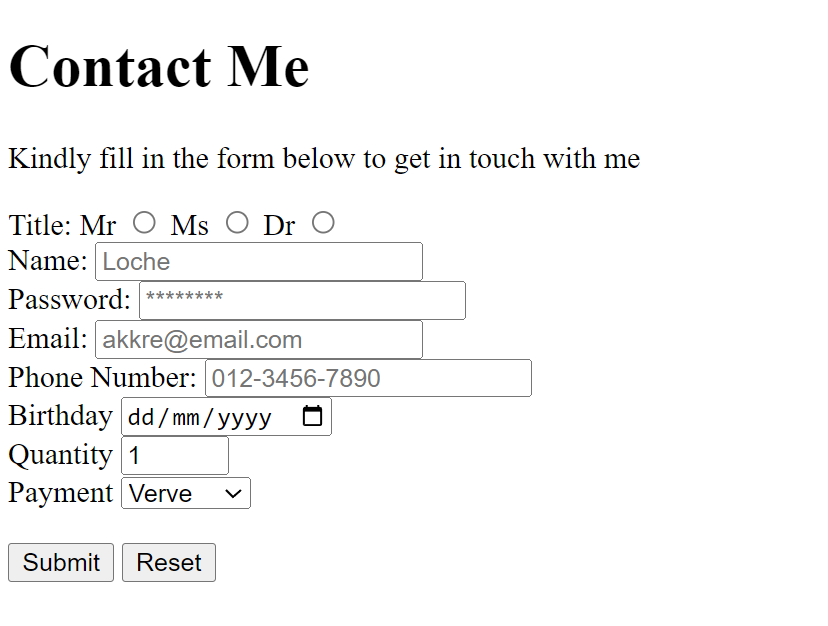
Drop-Down Field
We will create a drop-down menu for card payment. Again we will assume we are paying for a service just for demonstrative purposes.
Create a
labeltag and set the for attribute topaymentand contentPaymentInstead of an
inputtag, we use aselecttag withidattribute set topayment, and nest 3optiontagsFor the 3
optiontags, set theirvalueattributes andcontenttoverve,visaandgiftcard, and we have just created 3 drop-down menus.
 <!-- Drop-Down menu Field -->
      <label for="payment">Payment</label>
      <select id="payment">
        <option value="verve">Verve</option>
        <option value="visa">Visa</option>
        <option value="giftcard">Giftcard</option>
      </select>
        <br>
CheckBox Field
We will create a checkbox field for users to subscribe to imaginary newsletters
Create a
labeltag and set theforatribute tosubscribe, and the content toSubscribe to my NewslettersCreate an
inputtag, set thetypeattribute tocheckboxand theidattribute to match theforattribute of itslabeltag:subscribe
<label for="subscribe">Subscribe to my Newsletters</label>
<input type="checkbox" id="subscribe">
Textarea Field
We will create a textarea for users to be able to type in their comments
Create a
labeltag and set theforattribute tocomment, and set thecontenttoType in your Comments.Create a
textareatag and set theidto comment,colsto30androwsto10. cols and rows control the columns and rows. Set a placeholder as desired.
<label for="comment">Type in your Comments</label>
<textarea id="comment" col="30" rows="10" placeholder="i like coding"></textarea>
File Attachment Field
Again, Users will be able to attach files on this page, as follows:
Create a
labeltag with aforattribute offile, and content ofAttach a File.Create an
inputtag with atypeattribute offileand anidoffileWe can limit or specify the type of file that users can send by adding an
acceptattribute and specifying multiple filetype/extensionin the input tag, seperated by commas.Also, if you are expecting large sizes of file exchange on the page, it is probably important to set one more attribute to the form tag to be able to process larger files:
enctype="multipart/form-data". When we send a large data, this data is first broken down into smaller parts, sent, and the reassembled again.
<label for="file">Attach a File</label>
<input type="file" id="file" >
You can set the file to which the form data is sent as attributes in the form tag, but this is beyond the scope of this article.
This was a lot, but we have covered so much with forms, we can do with some styling but we will do this using CSS, soon.
Thank you for your time.